
In today’s unpredictable world, being prepared for unforeseen emergencies and survival situations is crucial. One of the fundamental aspects of survival preparedness is having a shelter that can protect you from the elements and provide safety and comfort. Whether you’re an avid outdoor enthusiast or just someone looking to be prepared for unexpected disasters, building a survival shelter is a valuable skill to possess. In this guide, we will walk you through the essential steps and considerations for constructing a survival shelter that can be your lifesaver when you need it most.
Understanding the Importance of a Survival Shelter
Before we dive into the nitty-gritty of building a survival shelter, let’s take a moment to understand why having one is essential:
- Protection from the Elements: A well-built survival shelter provides insulation from extreme weather conditions, including rain, snow, wind, and intense heat. This protection can be a matter of life and death in extreme situations.
- Psychological Comfort: Shelter not only shields you from physical discomfort but also provides a psychological sense of safety and security, which is crucial for maintaining a positive mindset during challenging times.
- Rest and Recovery: In survival scenarios, adequate rest and recovery are vital for making sound decisions and staying alert. A shelter allows you to sleep, recuperate, and regain your strength.
- Storage and Organization: Having a designated space for storing essential supplies and tools can help you stay organized and ensure you have what you need readily available.
- Long-Term Survival: In prolonged survival situations, a shelter can become a semi-permanent home, allowing you to maintain a sustainable lifestyle while you await rescue or navigate through the crisis.
Now that we’ve established the importance of a survival shelter, let’s delve into the step-by-step process of building one.
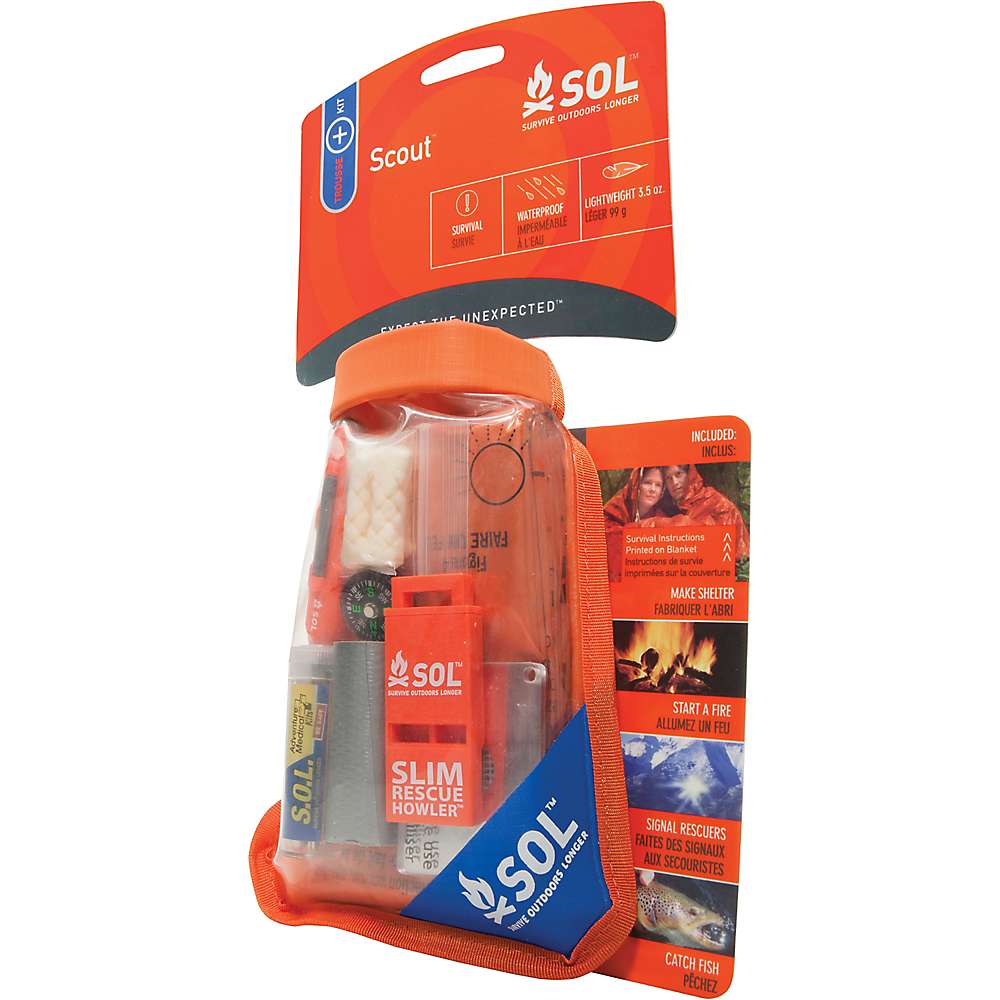
SOL Scout Survival Kit
Features of the Adventure Medical Kits SOL Scout Survival Kit Contains: Compass, Fire Lite™ Sparker, Survival Fishing and Sewing Kit, Survive Outdoors Longer Survival Blanket 96in. x 60in., Mini Rescue Flash™ Signal Mirror, Slim Rescue Howler™ Whistle, Tinder Quik™
Step 1: Choose the Right Location
The first step in constructing a survival shelter is selecting an appropriate location. Consider the following factors:
- Terrain: Look for flat or gently sloping ground that provides stability and minimizes the risk of flooding or landslides.
- Natural Resources: Take advantage of nearby resources such as trees, rocks, or natural formations that can be incorporated into your shelter’s construction.
- Water Source: Ensure that your location is close to a freshwater source to meet your hydration needs.
- Safety: Avoid areas prone to natural disasters like avalanches, flash floods, or areas with hazardous wildlife.
Step 2: Select a Shelter Design
There are various survival shelter designs to choose from, each with its own advantages and disadvantages:
- Tarp Shelter: Quick and easy to set up, a tarp shelter provides decent protection from the elements. All you need is a tarp and some cordage to create a basic A-frame or lean-to shelter.
- Debris Hut: This type of shelter involves using natural materials like sticks, leaves, and branches to create a small, insulated shelter. It’s relatively simple but requires more time and effort.
- A-Frame Shelter: The A-frame design is a classic choice for wilderness survival. It offers good protection against rain and wind and can be constructed using branches and foliage.
- Snow Cave: In snowy environments, building a snow cave can provide excellent insulation and protection from the cold. It requires specific knowledge and tools.
- Underground Shelter: If time and resources allow, digging an underground shelter can provide the ultimate protection from extreme weather and threats. This is a more advanced option.
Choose a design that suits your location, the materials you have available, and the specific survival scenario you anticipate.
Step 3: Gather Materials and Tools
The materials and tools you’ll need depend on your chosen shelter design. Here’s a general list of items you might require:
- Tarp or plastic sheeting
- Cordage (paracord, rope, or vines)
- Cutting tools (knife, saw, or ax)
- Sturdy branches or poles
- Natural debris (leaves, grass, pine needles, or snow)
- Rocks or sticks for anchoring and securing your shelter
- A shovel (for underground shelters)
- Insulating materials like pine boughs or blankets
Ensure that you have everything you need before you start building your shelter. In survival situations, being resourceful and adaptable is key.
Step 4: Construct Your Shelter
Now, let’s break down the construction process for two common shelter types: a simple tarp shelter and a debris hut.
Tarp Shelter:
- Find two trees or anchor points about 6-8 feet apart.
- String your cordage between these points, creating a ridgeline.
- Drape the tarp over the ridgeline, creating a sloping roof.
- Secure the tarp with stakes or rocks along the sides to prevent it from blowing away.
- Create a ground barrier by placing a tarp or foliage on the floor to insulate against the cold ground.
Debris Hut:
- Find a long, sturdy branch and lay it on the ground as your hut’s main ridgepole.
- Lean smaller branches or saplings against the ridgepole to form the hut’s frame.
- Add a layer of leaves, grass, or pine needles to insulate the interior.
- Cover the shelter with additional branches and debris to create a waterproof exterior.
- Create an entrance, but make sure it’s small to retain heat.
Remember to leave ventilation in your shelter to prevent condensation from building up inside.
Step 5: Finalize and Improve Your Shelter
Once you’ve constructed the basic structure, take some time to improve your shelter’s functionality and comfort:
- Insulate: Add extra layers of natural materials like leaves or grass to improve insulation and keep warm air inside.
- Secure: Ensure your shelter is sturdy and well-anchored to withstand wind and rain.
- Comfort: Create a raised platform or bed using logs or branches to keep yourself off the cold ground.
- Fire Safety: If conditions allow, set up a safe area for a campfire close to your shelter for warmth and cooking.
- Emergency Signaling: Use reflective materials or brightly colored objects to make your shelter visible from a distance in case of rescue.
Conclusion
Building a survival shelter is a valuable skill that can save your life in emergency situations. Whether you’re lost in the wilderness or preparing for a disaster, having the knowledge and ability to construct a shelter can provide you with the protection and comfort you need to survive. Remember that practice and experience are the best teachers, so take the time to hone your skills and adapt them to various scenarios. With the right preparation and mindset, you can create a secure haven when you need it most, ensuring your safety and survival in challenging times. Stay safe, and happy shelter building!
Reading More
Watches are a critical component of survival. Here are some of the best watches for outdoor recreation.